How to install your pack?

Frequently asked questions
How to download the pack?

There are three ways to download your pack:
- Directly after the checkout page, click the "DOWNLOAD YOUR PACK" button.
- You will receive an email with a download link to your purchase.
- Access your purchases by logging into your account on our website. (For more information about accounts and registrations, check this article.)
How to install my pack?

- After downloading your pack, you’ll get a zip file.
- Double-click the .zip file to unzip it, which will give you a folder.
- In that folder, you’ll find a couple of things. The installation instructions, the DRFX file for DaVinci Resolve, and the fonts used to create the assets.
- Start by installing the fonts. Without them, DaVinci will not know which font to use, resulting in a black screen. To install the fonts, go to the font folder, select all the fonts, and double-click on them. This will open a window asking if you want to install the fonts; select “Install.” Alternatively, you can drag or copy and paste the fonts into your computer’s font folder.
- Once the fonts are installed, double-click the .DRFX file to install the pack. This will open DaVinci Resolve (if it’s not already open) and prompt a window asking if you want to install the pack; select “Install.”
- In DaVinci Resolve navigate to the Edit or Cut page, where you’ll find your pack in the Effect Library under Titles, Transitions, Generators, or Effects depending on the type of asset you’ve purchased.
My title do not work. I'm getting a black screen!

Please ensure you’ve installed the fonts provided with your download. If not, DaVinci will not recognize the font, resulting in a black screen.
If you’ve installed the fonts but still see a black screen, it may be due to a corrupt installation or a conflict between font names.Try re-installing the fonts and restart your computer.
If it still doesn’t work:
- Identify the font name used for this pack by checking the name of the file in the font folder of your download.
- Navigate to your computer’s font folder and manually uninstall any font families with similar names that might conflict with the one you’re trying to install.
- After deleting the conflicting fonts, reinstall the fonts again.
Where can I find my pack in DaVinci Resolve?

Access your pack from the Edit or Cut page in DaVinci Resolve’s Effect Library.
The final location of the pack depends on the type of assets you’ve purchased. They could be in four different sections of your Effect Library:
- Titles
- Transitions
- Generators
- Effects
They will be neatly organized under Video Editor Studio > Name of Your Pack. Alternatively, you can search for the pack or a specific asset using the search bar. We’ve structured the naming convention of each asset for easy searching with keywords.
How to create a customer account?

An account linked to the email address used for your purchase is automatically created at checkout, even if you don’t set a password for your account.
There are two ways to access your account:
- Use “Google Sign-In” with the email you used for your purchase to automatically connect to your account.
- Click “Forgot your password?” to send an email to set up a new password.
Note: You can use only one of these methods at once. If you use “Google Sign-In,” this will become your new login method by default, and your password method will be deactivated. You can revert this change by clicking “Forgot your password?” to reset a new one. This will not affect your account content, just the login method.
How do I update my pack to the latest version?

If your pack receive an update you’ll receive an email with a link to your customer account to download the latest version.
- Once you’ve dowloaded the file, you can simply unzip it.
- Then double click on the DRFX to prompt open Davinci and the installation window.
- Select “Overwrite” to install the updated version of the pack.
Note: There’s no need to install the fonts as they should already be installed on your computer.
Installation Process
Going through everything you need to know to install properly your assets in Davinci Resolve.
How to get better playback and performance?

Over the years, BlackMagic has greatly improved the performance and playback of Fusion templates, and they continue to do so with each update.
However, complex titles or effects can still be challenging to play back in real-time, especially on higher resolution timelines.
Here are some solutions to improve playback:
Render Cache
By using the Render Cache option, DaVinci Resolve will automatically cache your Fusion composition in the background, allowing real-time playback once cached.
To activate Render Cache, go to the menu tab: Playback > Render Cache > Smart.
A red bar will appear above your Fusion element, gradually turning blue as it caches. Once cached, you’ll get real-time playback without frame drops. Keep in mind that any alterations to the Fusion element will require re-caching.
How to re-use and save your customised titles with Power Bins?

If you are re-using a specific title a lot you can customise it with your text, colors and media. Then save it for future use using the Power Bins feature inside of Davinci Resolve that way you will not have to always make those modification every time you need to use it.
Are your assets working with any resolution?

For a long time, DaVinci Resolve couldn’t auto-rescale from horizontal to vertical timelines. This changed with DaVinci Resolve 19 and the Shape Node System upgrade. Now, all our assets moving forward will automatically rescale to any aspect ratio.
For older assets not built with the Shape Node system, there’s a workaround to make them work in vertical timelines.
Are your titles working in any frame rates?
Yes, all our most recent assets use anime curves, which allow us to automatically adjust the timing of the animation to any frame rate. Additionally, you can easily retime the duration of the animation from the edit page.
How to adapt titles to vertical timelines?

For a long time, DaVinci Resolve couldn’t auto-rescale from horizontal to vertical timelines. This changed with DaVinci Resolve 19 and the Shape Node System upgrade. Now, all our assets moving forward will automatically rescale to any aspect ratio.
For older assets not built with the Shape Node system, there’s a workaround to make them work in vertical timelines.
All my titles are duplicated twice in my effect library

If you see the same title installed twice in your DaVinci Resolve Library, it may be because you have two DRFX files installed for the same pack but with different names.
To fix this:
- Go to: Fusion > Effect Library > Templates
- Right-click on Templates (it may take a while to load, depending on the number of assets you have).
- A dropdown should appear, offering the option to Show Folder.
- This will open the folder where all your DRFX files (packs) are installed.
- Look for the two packs with similar names but slight differences and delete the oldest one.
How to uninstall a pack?

- Go to : Fusion > Effect Library > Templates
- Right click on Templates (It might take a while to load, the more assets you have the longer it takes)
- Then a dropdown should appear offering you the option to Show Folder
- This will bring you to the folder where all your DRFX files are installed (aka. your packs)
- Just look for the DRFX you wish to uninstall and delete it from the folder.
My title was working but now it's only showing a black screen
The main cause of titles not showing and resulting in a black screen is due to fonts not being installed or being corrupted.
Another possibility is that the title you are using has a loader functionality to use media in the title/effect. If that media has been deleted/renamed/moved, it becomes unlinked, causing DaVinci to display a black screen.
To fix this, reload your media in the loader of the title/effect:
- Select your title/effect.
- Go to the inspector, navigate to the loader section, and select “Browse” to open a window and select your media.
I'm getting an error message when I drag my title in the timeline

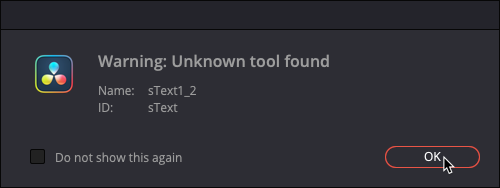
If you are getting an error message telling you "Warning; Unknow Tool Found" when you are dragging your effect to the timeline this means that the effect is using a node that doesn’t exist in your Davinci Resolve.
Most likely because it’s a node that has been added in a latest version of Davinci Resolve. To fix this you simply have to update your Davinci Resolve to the latest available update and this should fix the issue.
Performances & Usage
How to get the most out of your pack for optimal performances and usage experience.
Do you have titles I can try for free?
Yes!
We have a Free Starter Pack you can download.
Also most of our packs have a free sample that you can download and experiment with to get a feel of the pack. It's available on the page of the product.
What license comes with the packs?
You can use our pack for any personal or commercial projects without any restriction.
The only thing not permitted is the re-sale of the pack or it's individual components.
Do you have a tutorial on how I can use my pack?
Yes! Simply go to the product page of your pack. You’ll find a demo tutorial on how the pack works and how to get the most out of it.
Will more content be added to my pack in future updates?
No, we’re updating the pack only if there’s bug to fix. Otherwise packs do not receive additional content over time.
Can I get a refund?
Due to the nature of our products being digital, once a product has been downloaded, no refund/return/exchange can be issued. Any sale is final.
Do you have an affiliate program I can join?
Does your pack work on Ipad?
No, as of right now, none of our assets work on DaVinci Resolve for iPad. They only work on the desktop version of DaVinci Resolve.
